Our Jayco Silverline came with heating in the form of airconditioning. This is very noisy and relies on mains power. A 2kW generator can run it as most caravan airconditioners have a ‘slow’ start limiting the in rush current which would otherwise trip the generator. An alternative is to use a small fan heater which we use in powered caravan sites. Many free camping sites without power (especially national parks) ban the use of generators so an off road solution is needed.
A few years ago (2012) we took a motor home trip in New Zealand. It was cold at night but the motor home had a Webasto diesel heater. We we impressed by the effectiveness of the heater. It was also reasonably quiet and used little diesel. I knew we had to have one when we got the caravan.
There are several makes including Eberspacher and Webasto ( made in the same town in Europe) and Truma. They are good quality. You can also get them as gas heaters which some may prefer. They are similar in performance but if you are doing a self install the gas heaters will require a gas plumber to do the final installation. I liked the idea of diesel in that it won’t drain the gas supply already being used for the fridge , warer heater and stove/ oven if off grid.
I decided to look around for a cheaper version and found the Planar brand that looks similar to the Webasto/Eberspacher models.
I found the Planar brand on Ebay form an Australian supplier at a much lower price. I also could not find a significant number of complaints. I did have a query relating to instructions and the supplier was very helpful and quick responding.
Please note this setup has been updated due to failure of this version.
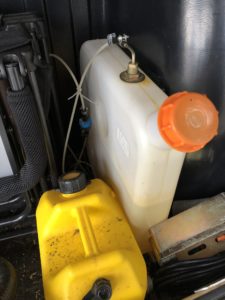
I got a kit consisting of Planar 2KW Caravan Motor Home Diesel Heater with 2 x Vents, 2 x Duct And Tank. The tank is a green coloured metal tank. It included every thing including ducts and controller..
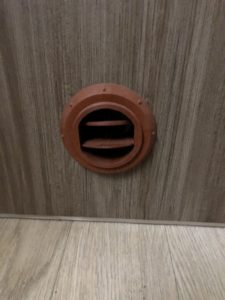
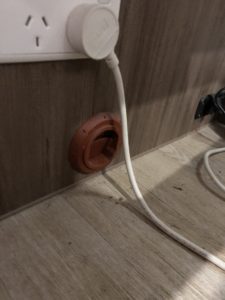
The vents are black and I wanted a brown colour to match the decor. These were obtained via Ebay form a UK supplier.
Now the Silverline has a ‘sealed’ font boot made of fibreglass or plastic and this is separate form the gas bottle locker on the front left with no holes between. There was no place to easily mount the tank on the back and although this could be done but would look ugly. I decided to put the tank in the front boot up against the divider between the boot and gas bottle locker.. I fashioned a support to hold the tank as a free standing tank mounted sideways (ie back of the tank was against the dividing wall. This placed the inlet to the tank which was in the middle of the top of the tank further in the boot but it was usable if a little harder to fill without spilling diesel in the boot.
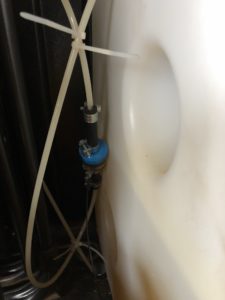
On our first trip the heater seemed to stop, I assumed for some reason it must be out of fuel so I filled the tank which overflowed into the boot! Lesson learnt. I replaced the metal tank with a plastic one which means the diesel level can be seen through the plastic and the filler cap is now at the front of the can. I mounted this by gluing the tank to a rubber mat then that to the side wall of the gas bottle locker (no holes drilled. The fuel line after passing through the fuel filter passed through the drain hole in the boot. No extra holes in the boot!
The main unit is mounted in the floor under a bench seat that faces front and is in the middle of the van on the left side. The 12 volt power comes from a close by source in the external entertainment bay. No extra holes!
The fuel line was easily fed from the boot into a fuel pump near the front of the van under the floor then onto the main unit. The fuel pump is fully suspended under the floor in a foam cover secured with cable ties. This makes the noise of the pump very quiet. The mistake is to secure the fuel pump to the floor which acts like a speaker and an incessant clicking can be heard. The wires to the pump feed back along the fuel line from the heater.
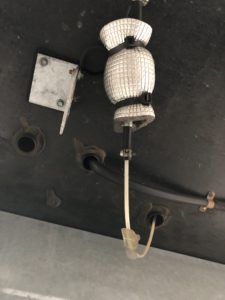
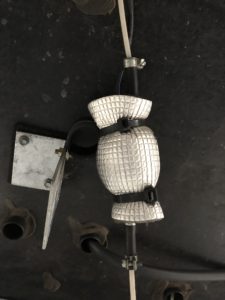
The air intake pipe for the diesel ‘furnace’ is short but that doesn’t matter and was secured under the chassis/ floor nearby.

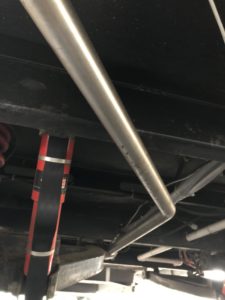
The exhaust tube is also short and while it could reach the left hand side of the van , that is where people may sit outside. I wanted it to exhaust in any other direction but it meant it would exhaust under the van. As the van has a slide out I was concerned that the slide out may not be gas proof and carbon monoxide may ingress causing illness or the demise of the occupants. I did 2 things to solve this
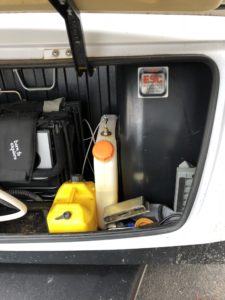
I installed near the bed a carbon monoxide detector near the bed. I uses batteries. I sourced this (and a gas leak detector which is not required for the diesel installation ) from Bunnings.
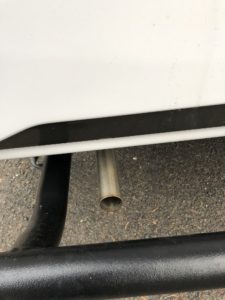
The other solution was to add an exhaust pie made of stainless steel that vents out the back of the van. I needed to run this under the van without modifying anything. I used plastic electrical conduit and a hot air blower to make a pipe with suitable bends. This was given to the exhaust pipe manufacturer to make the tail pipe. It was split in two sections to make it easy to transport in the car and the manufacturer flared ends as appropriate to make joins easy.
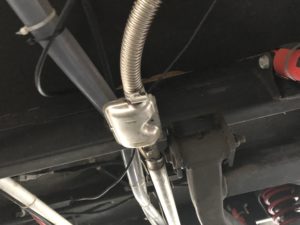
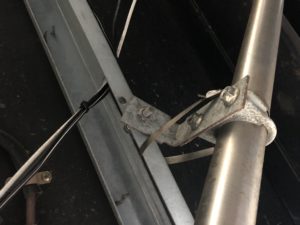
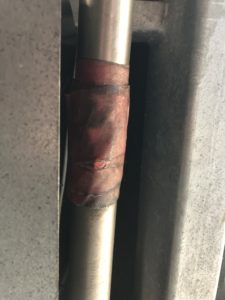
So I connected the supplied heater exhaust pipe to the supplied muffler and this connected to the exhaust pipe. I needed some exhaust tape to deal one join.
Inside the van the heater outlet pipe was connected to a vent at the back of the seat and the inlet vent was connected to the inlet of the heater. This proved to be quite difficult and I found that my brother who installed a Webasto left this off for good reason. As the heater is in a confined space under a seat there is a little heat in there. The gap between the inlet vent and the heater inlet means air is drawn from the vent and from the under seat space thus helping to remove this heat.
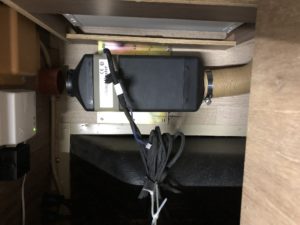
The controller was placed at he rear of the van on a wall near the bathroom area. I added a 12 volt switch with this to ensure when travelling there is no chance the heater would run inadvertently.

It works. The only problem there is a fan rattle on startup only but i can live with that.